How to Install Google Analytics on Blogger
![]() Wouldn’t it be nice to know how many people actually visited your blog each day? How about knowing which of your posts are the most popular? Well surprisingly Blogger doesn’t currently offer any native blog analytics but fortunately there is Google Analytics — available for free.
Wouldn’t it be nice to know how many people actually visited your blog each day? How about knowing which of your posts are the most popular? Well surprisingly Blogger doesn’t currently offer any native blog analytics but fortunately there is Google Analytics — available for free.
Google Analytics is a great tool that will show you all sorts of useful information about how people found your blog, keywords they searched on to find you, where they came from and even how long they stayed. You’ll learn more about where your visitors come from and how they interact with your blog. This is a must tool if you are trying to build a profitable blog otherwise you are flying blind!
This article will show you how to add Google Analytics to your Blogger blog. It’s a fairly simple process and doesn’t require any technical skill at all.
Step #1 – Setup a Google Analytics Account
Go to Google Analytics and sign in using your Blogger login. If your account doesn’t work for some reason, you can create a new one instead. Once you login you’ll see a screen that looks like this:
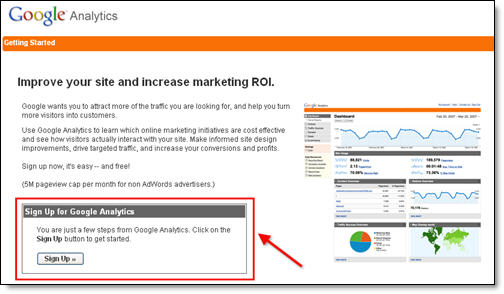
Click on the “Sign Up >>” button and proceed to the next step which will ask you for your general information. Website URL, Account Name, Country, and Time Zone. The screen will look like this:
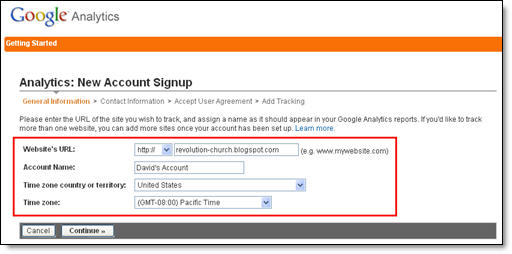
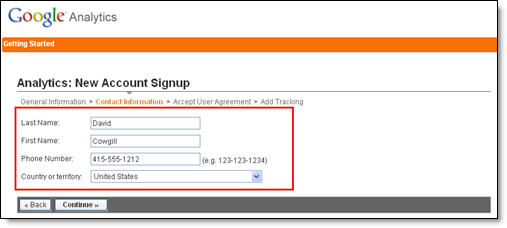
If you noticed, I just put my Blogger url (without the https://) and called it “David’s Account” because this is your top-level container for 1 or 100 different websites so it’s a good idea to name it something more general. The next step will ask you for your contact information which includes your first name, last name, phone number, and country. Easy so far right? 🙂
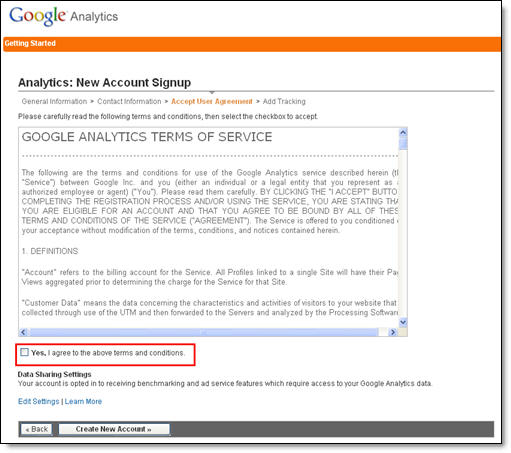
Your last step in signing up will ask you to accept the user agreement terms and conditions which you should read (just kidding…who actually ever reads these entire legal terms anyhow?).
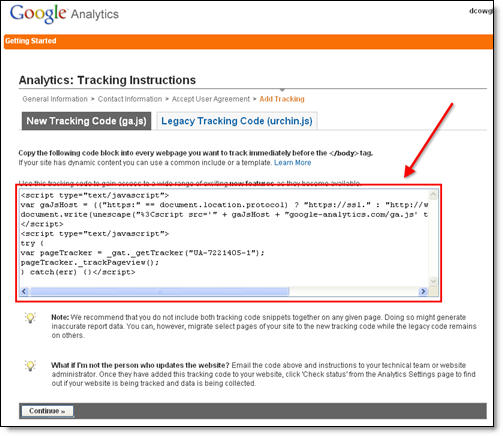
Now this next screen is very important. This is the code you will need to copy and paste into your blogger template. Go ahead and click into the box and it will automatically highlight the entire block of code for you. Now you need to copy that code and paste it into notepad or into a MS Word document. Save it as you’ll need to use it later.
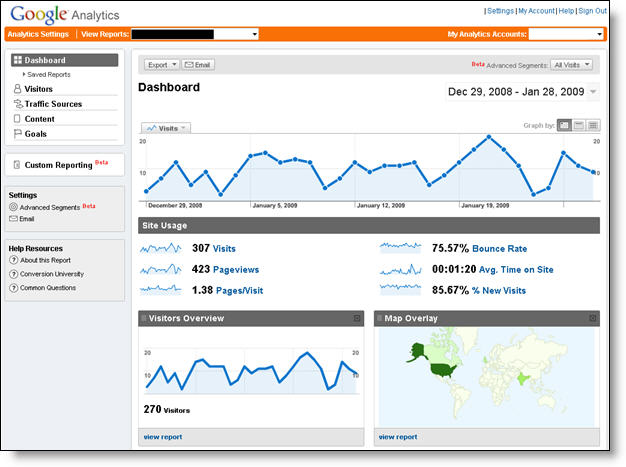
After you click on the “continue >>” button you will be taken to your brand new Google Analytics dashboard! You will see your blogger blog listed but with no analytical data….yet.
Ok, now you are done with setting up your Google Analytics account. The next step is placing the tracking code into your Blogger template so it can report back to Google Analytics and provide you with some cool data points.
Step #2 – Adding GA Tracking Code to Your Blogger Template
This is not a very difficult step even if you are afraid to touch your template code. Login to your Blogger account and then click on the “Layout” => “Edit HTML” tabs. This will bring you to the template code. Before you make any changes, I advice you to back up your template just in case there are any problems. After you’ve done so, continue reading.
Now in the edit template html code window, scroll all the way to the bottom of your template code and look for the </body> tag. There should only be one of these closing tags in your template. If you can’t find it then your template wasn’t properly created and you should add one right above the </html> tag.The </html> tag should always be your last line of code in your template. It signifies the end of your template.
Ok, now go back to the code you saved before in a Word Doc from Google Analytics. You are going to copy it and paste it right above the </body> tag as illustrated in the image below. The yellow highlighted code is the new GA code I just pasted into my template.

Save your template and you shouldn’t get any error messages. If you do, it’s most likely not related to this GA code and something else with your template itself. Assuming you’ve been successful with your save, you are all done embedding the GA code in your template!
Step #3 – Confirm Google Analytics is Tracking
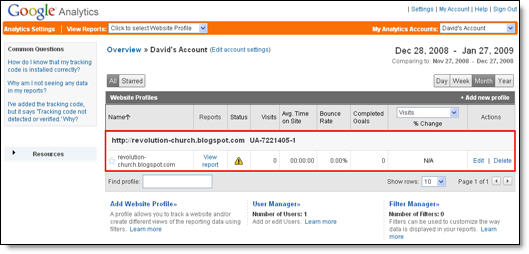
Go back into your Google Analytics account and look at your dashboard. Most likely you will see a little yellow exclamation mark under the “status” column that looks like this: ![]() . This means everything isn’t working properly yet which is fine because we are about to tell GA we just added the code. From your dashboard, click on the “edit” link which is located to the far right.
. This means everything isn’t working properly yet which is fine because we are about to tell GA we just added the code. From your dashboard, click on the “edit” link which is located to the far right.

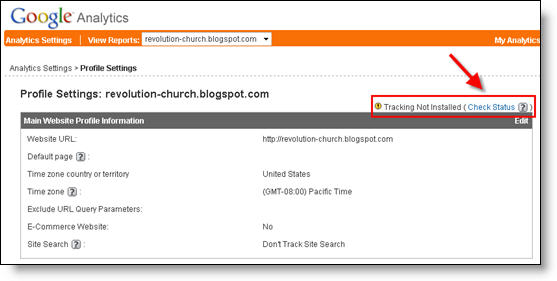
After you click on that link, you’ll see another screen like below. It will say “Tracking Not Installed” followed by a link “Check Status”. You’ll want to go ahead and click on that link which will tell GA to visit your site and look for the new code you just pasted in your template.
Assuming you pasted the code in there as instructed above, GA will find the new code and begin tracking everything on your blog. If you are still having problems, it’s most likely something to do with GA and you should read their help guide to troubleshoot your problem.
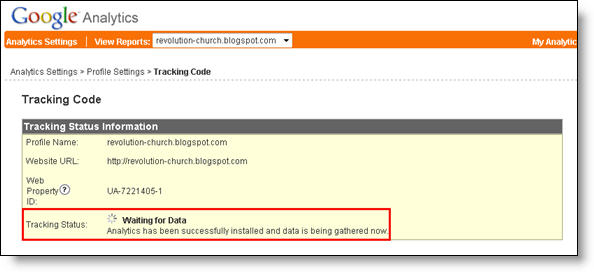
The message seen here, “Waiting for Data” means you have correctly setup GA and data is being gathered! Click on the top left Google Analytics logo and it will take you back to your dashboard. From there click on the “View report” link and that’s where all your very important Blogger visitor data will start appearing!
Now it usually takes an hour or so before you will see any data (maybe longer if you don’t get much traffic to your blog) so please be patient. Trust me, you’ll be logging in at least once a day just to see how much traffic your blog is getting. It’s very addicting and powerful information to learn from. You’ll be surprised which posts are your most popular and what countries people are coming from to read your blog.
Google Analytics is very powerful and we have just learned how to install it into your Blogger template. We haven’t even scratched the surface on the features and reporting it can do. For most Bloggers, this will be enough. Data will be collected and you will just review it. Others with more in-depth goals (like selling products or services, creating a sales funnel, etc) will want to spend more time learning GA. Hope you enjoyed the tutorial and don’t blame me for your new found addiction!
Ready to super charge your blog? Check out our professional premium blogger templates or make money by joining our blog affiliate program!
If you like this post then please consider subscribing to our eBlog Templates RSS feed. You can also subscribe by email and have new templates and articles sent directly to your inbox.
Trackbacks
- Back to Basics: Setting up Google Analytics on your Blog | rapid-DEV.net on June 14, 2009
- Back to Basics: Setting up Google Analytics on your Blog | work4real on June 16, 2009
- Special Post: Installing Google Analytics on Your Blog « Winning with Marketing Analytics on July 25, 2009
363 Responses to “How to Install Google Analytics on Blogger”
Blogger Sponsors
- Improve Your Blog in 31 Days – Guaranteed
- Build a Better Online Business with WordPress
- Become a Blogger Just Reopened – 5 Days Only!
- Roadmap to Become a Better Blogger
- Free Image Hosting – Photobucket
- How to Install Google Analytics on Blogger
- Improve Your Google Rankings in One Easy Step
- 50 Excellent Blog Footers
- Free Instant Blog Logos
- Create Cool Images With a Wet Floor Effect Maker
Nice Tips David, thank a lot…..
Thank you. Your tutorial was much better than the others. Other tutorials did not explain the part about clicking edit and then hitting check status. Check out my blog
Kourtesy
Thx David,i’ve done complite my google analytic.
Thx for the tips.
Nice and great Article David!!
thnx a lot!
This is so cool David, thank you for the easy to follow, step-by-step tutorial. You are right, IT IS ADDICTIVE! I’ve installed it and since then, i’ve been logging on to it every morning! More often than i have posts on the blog! Ha! Ha! 😉 Thanks mate!
This was an absolutely fantastic step by clear step explanation. just breezed through it. I only wish i could have had a similar one for how to do it with wordpress. Thanks indeed..
thanks … it works http://www.ivan90112.blogspot.com
Great post…
I have installed analytics in my blog rite now and its working boom boom..
thanx David!
Earn more money!
Thank you very very much =D
tanx david for your guide
Thanks man. This helps my blog that helps poeple to get around mlb.tv blackouts.
Hi David!
I’ve already installed analytics but I want to know something about “Legacy Code,” the tab next to the “New Code.” Can you help me what is it and how it works???
Thanks David That was SO Helpful
Thanks Again
Thank you…The steps on Google Analytic say past immediately before …not above it…Thanks again…
sorry paste…so excited I cant type good….
Very helpful. Thank you.
The use of screenshots made a lot of convenience. I needn’t read the whole stuff. Just skimmed through and managed to get it GA up.
Thanks alot…
Nice post. I have set it up.
Perfect – worked first time! Thanks.
David you are the man. Thx bro!
Thank You David 🙂
good articel.. thanks to your information
Thanks David it was helpful….
Wow! Thank you so.o.o… much! That was so easy. Can’t wait to tackle tip #2.
Good post, thanks david
Thanks for information, I will try it, must
good post, good job, thanks
I must try it, good, thanks 🙂
I like it, I must try it, good job
I find that this
mmmm, great to try, thanks
mmmmm….
Just try 🙂
Thanks!All has turned out! 🙂
thank you dude4 that………..hey my blog is not appearing in google search…van you help me with tha?
http://www.hack-krishna.blogspot.com
thanks fo your sharing
i had already add analytics in my blog
regards by yosaadi.blogspot.com
David, thanks a lot… you’re perfect … all is the same as you said….
Thankyou so much for taking the time and trouble for posting this. Its really helpful.
Roseanna
thank u thank u thank uuuu ~_~
Great tutorial. It was very useful 🙂
Hi,
Indeed it was very clear n good help. Just added to my celeb blog. (When Celebrity Were Kids)
http://wcwk.blogspot.com/
Regards,
-wcwk
nice article…..very helpfull for me
thanks for share..i will try to applicated
thank you for your good sharing,it’s a very useful, and I’ll be waiting for the next your post,
thank’s for post it..
Thanks…This was easy and effective!
Oh yea, I like it, it is I need
Good posting!!
I have tried it
Thanks, David. It’s very useful to my blog.
That really helped a lot! I was so confused and this made it so easy, Thank you so much