(Don't have an account yet?
Register for free!)
Blogger Template Info
- Author: eBlog Templates
- Views: 105,004
- Downloads: 30,904
- Added: Jan 24th, 2008
- Rating:


- Live Demo
WP-Polaroid Blogger Template

I’m very pleased to announce the release of WP-Polaroid for Blogger! This template is full of cool features and took me a long time to convert from the original WordPress theme (by Adii) so I hope you appreciate it. 🙂
This template is very popular with WordPress users and for good reason. It’s stylish, nicely laid out, and very web 2.0. Not only that, it’s also got the following sidebar page elements built in. You just need to configure them (follow the directions below) in order for them to work properly.
- Flickr photo slideshow area where you can display your personal or random pictures
- Mybloglog recent blog readers section (you’ll need a mybloglog account)
- Three 125×125 ad spots to help you make money from your blog
- Recent posts list
- Recent comments list
- Two sidebar link lists
- Page navigation links in the header
- RSS feeds for your posts and comments
- A header spot to display your personal photo
Make sure to read through all the steps below in order for the template to function on your blog properly. I tried to make it as simple for you as possible by using the Page Elements instead of embedded code but if you have any questions, please post them below. I usually get back to everyone within 24 hours so please be patient!
Also, please be aware that in order to correctly setup this template you’ll need to be comfortable with editing the template code as well as some experience with photo editing software (see step #9). I’d hate for you to spend a bunch of time trying to get this template working only to hit a road block towards the end.
WP-Polaroid Blogger Installation
Now I’m going to be honest with you before we begin. When you use this template you’ll most likely have to wipe out all your existing page elements and start from scratch. Not only is this easiest but it also gives you a clean slate. Now this isn’t always the case but I just wanted to warn you upfront. You might even want to setup a new blog within Blogger to test this template out before you really start using it. It’s easy to do — just go to your Blogger dashboard (top right corner link) and “create new blog”. Think of it as a testing area before clobbering your existing blog. Another option is to try and backup your existing page elements which is explained in my “How to Install a Blogger XML Template” article.
Disclaimer: I am not responsible if you mess up your Blogger site. This template and set of instructions is free but does not come with any sort of warranty. I’m sure you already realize this but I just wanted to cover my butt regardless. (this is the fine print)
The following 10 steps assume you’ve installed the new WP-Polaroid Blogger template and are now ready to configure the page elements. If you had trouble installing the template, try applying it a second time and saving. Blogger is buggy and that’s actually what I had to do when setting up a demo blog for this writeup (Update – you might want to start with step #10 and then come back to step #1 since it involves editing the actual template code before setting up the page elements).
You can also download the original Photoshop .psd from Adii’s site if you’d like to modify the images. He also provides some steps on setting up the template but for WordPress only.
Open your blog site in a new browser window so you can see how it currently looks. I’ve put some placeholder text in some areas (which we’ll replace in the steps below) to give you an idea as to how it’s supposed to look. Now in a separate browser window, head on over to “Template” =>”Page Elements” and we’ll start setting up your new Blogger template.
Step #1 – Configure the Header Page Elements
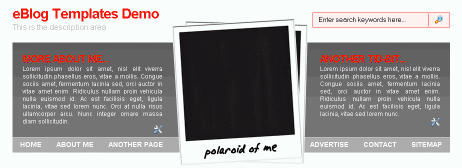
First we’re going to customize the header and we’ll start with the Header-Text-Box-Left page element which you can see marked with a red square in the image.
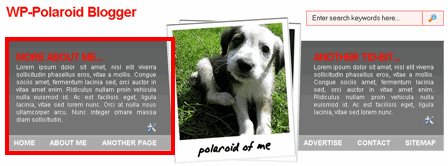
Now when you edit the page element you’ll see “Header-Text-Box-Left” as the title which you can change to something like “MORE ABOUT ME…”. Then add whatever text you want in the text box which will end up appearing below the title (like the white text in the image). Ok, save your page element and you’re done with this box. Do the same with the “Header-Text-Box-Right” page element and you’ll be finished with the header text boxes. Save and then refresh your other Blogger browser window to see what it looks like. We’ll take care of the header links and center puppy image later on since it requires editing of the template code. Let’s move on.
Step #2 – Setup Recent Posts and Recent Comments Page Elements
These lists aren’t going to show up when you first installed the template so we’re going to bring them to life now. They are actually both RSS Feed widgets so we’ll need to paste in your feed and comment rss feeds to make them work. Let’s start with the Recent Posts page element so click edit it. Then paste in your RSS feed url which will most likely be in this format https://YOURSITE.blogspot.com/feeds/posts/default . Make sure to replace “YOURSITE” with your actual blog url.
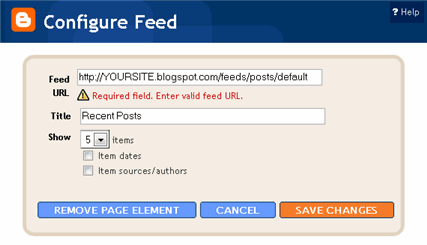
There’s no need to change the title (unless you want to call it something else) so then hit “Save Changes”. Then save your blogger layout and go over to your other browser window, refresh and see the Recent Posts appear in your blog’s sidebar. Pretty cool huh! Now you’re going to do the exact same thing with the “Recent Comments” page element but you’ll instead use this feed format https://YOURSITE.blogspot.com/feeds/comments/default . Again, make sure to replace “YOURSITE” with your actual blog url. Save and make sure it’s working properly. If it doesn’t appear on your blog, chances are you don’t have the correct feed url or you might not have any comments yet.
Step #3 – Setup My Sponsors and Link Love Page Elements
These two page elements are basically link lists where you can links to any sites. Did you know that you can actually sell links from your blog? It’s a very popular and growing business on the web since the number and quality of links to ones’ site increases their rankings in Google and Yahoo. If you want to learn more about selling links on your blog, check out Text Link Ads for more information. I use them and they do a 50/50 revenue split which is great since they handle the advertising & transactions.
Anyhow, to setup the link page elements, click on edit of the My Sponsors page element and then enter the names and urls of the sites you wish to link to. Feel free to add a link to my site so other’s know where you got this wonderful template!
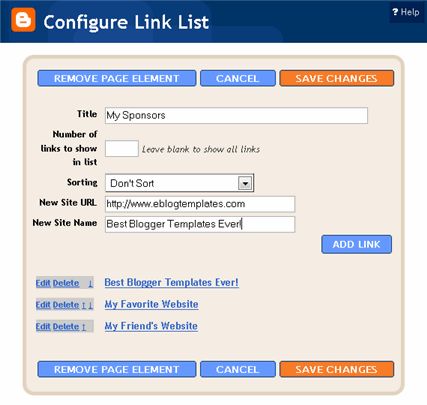
Now do the same for the Link Love page element to get additional links added. If having both link page elements is too much, feel free to delete one from your page layout.
Step #4 – Configure the Blog Archive Page Element
This page element should have been working from the moment you installed this template. The only problem is it probably didn’t look right because the page element style needed to be set to “Flat List” so let’s do that now (if your blog archive list is already set to flat, then you can skip this step). Edit the page element and change the default of “Hierarchy” to “Flat List”. You’ll see it change in the preview window so you’ll know it worked.
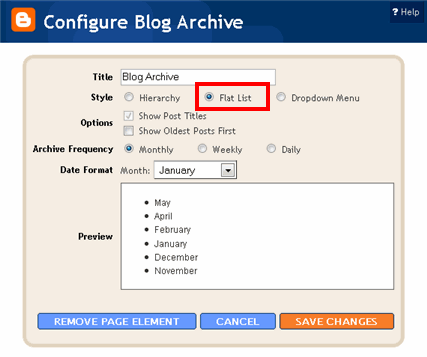
Click “Save Changes” and then save the page layout. Now view your blog which you have open in a separate browser window to see how it looks now. It should be correct.
Step #5 – Configure the Recent Readers Page Element
Now this is one of the unique and cool features about this template. It’s integrated with MyBlogLog which is a cool tool for showing pictures of visitors to your site. If you don’t already have an account, you need to set one up first before completing this step. Once you’ve setup an account, claimed your blog, then you can create a widget. I’m going to assume you’ve done those steps and are now ready to plug in your widget. You should be on this screen now within mybloglog.com.
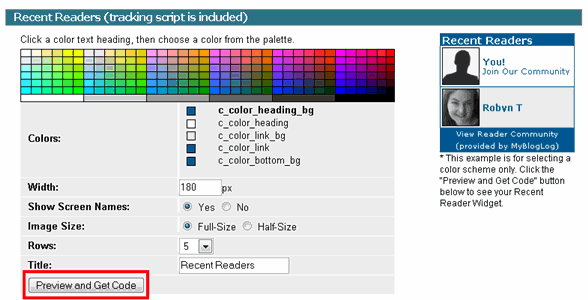
We’re going to make this very easy so don’t worry about any of the colors, width, etc and just click the “Preview and Get Code” button. I know this sounds strange but just stick with me here. So the next screen you’ll get a page with the blocks of code you can use. It will look like this:

The only piece of that code that we need is the part I’ve marked in red. This is the mblID code which is the unique id just for your blog. you’re going to copy this entire id code (I covered some of the digits in the screenshot on purpose) which should be 16 numbers, and put it somewhere safe (like open notepad and paste it there for now).
<script type="text/javascript" src="https://pub.mybloglog.com/comm2.php?mblID=PUTYOURCODEHERE&c_width=425&c_sn_opt=n&c_rows=2&c_img_size=f&c_heading_text=Recent+Readers&c_color_heading_bg=FFFFFF&c_color_heading=ffffff&c_color_link_bg=FFFFFF&c_color_link=FFFFFF&c_color_bottom_bg=FFFFFF"></script>
Then take this javascript code above and replace the “PUTYOURCODEHERE” with the 16 digit number you just put somewhere safe. Next, you’re going to edit the “Recent Readers” page element and paste this new code into the text box. It will look like the image below but it won’t wrap (I just did it for illustration purposes).
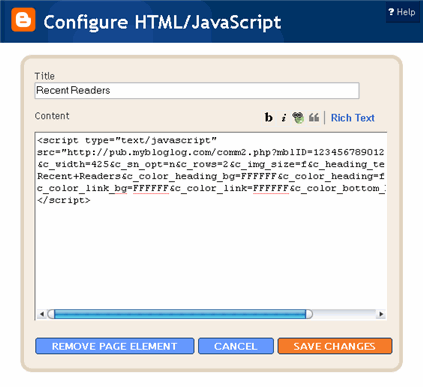
Click “Save Changes” and go preview it in your blog. This will replace the current set of mybloglog pictures you see on your site with your set of visitors. Now don’t get too excited because there’s a good chance this section will be empty for a while (almost for sure if you just signed up for a mybloglog account) since you haven’t had any visitors yet so don’t worry. Give it a few weeks before you’ll see some pictures appear.
Step #6 – Configure the Flickr Photo Page Element
This is another optional page element and you can go ahead and delete it if you want. The configuration requires you have a Flickr account and some experience picking out pictures to link to. The pictures that are already installed on this Blogger template are basically links directly into Flickr. There are more than one way to get this section working (like using rss instead of hard coded image links) but I’m only going to show you the simple way. First edit the “FlickrRSS” page element and make sure you’re in html edit mode. Then in the text box you’ll want to paste in the new image code you want to use (see below for the proper format). It will look something like this:
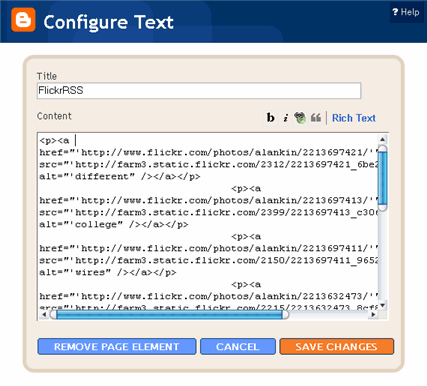
Here’s the code I’m currently using to make the images work:
<p><a href='https://www.flickr.com/photos/alankin/2213697421/'><img src='https://farm3.static.flickr.com/2312/2213697421_6be21edcfa_s.jpg' alt='different paths' /></a></p><p><a href='https://www.flickr.com/photos/alankin/2213697413/'><img src='https://farm3.static.flickr.com/2399/2213697413_c30648a36a_s.jpg' alt='college campus lawn' /></a></p><p><a href='https://www.flickr.com/photos/alankin/2213697411/'><img src='https://farm3.static.flickr.com/2150/2213697411_96525d4022_s.jpg' alt='wires in front of sky' /></a></p><p><a href='https://www.flickr.com/photos/alankin/2213632473/'><img src='https://farm3.static.flickr.com/2215/2213632473_8cf8af1c7f_s.jpg' alt='aerial perspective' /></a></p><p><a href='https://www.flickr.com/photos/alankin/2213632465/'><img src='https://farm3.static.flickr.com/2043/2213632465_5ce3aa4813_s.jpg' alt='clouds' /></a></p><p><a href='https://www.flickr.com/photos/alankin/2213632461/'><img src='https://farm3.static.flickr.com/2392/2213632461_96a8be9c06_s.jpg' alt='clouds over the highway' /></a></p><p><a href='https://www.flickr.com/photos/alankin/2214395424/'><img src='https://farm3.static.flickr.com/2253/2214395424_b9f11a18c0_s.jpg' alt='The Poultney Inn' /></a></p><p><a href='https://www.flickr.com/photos/alankin/2214395422/'><img src='https://farm3.static.flickr.com/2133/2214395422_1aa98af39f_s.jpg' alt='apartment for rent' /></a></p>
So essentially you need to find pictures on Flickr or somewhere on the web that you want to link to. Using Flickr’s small image size makes sure that they will properly fit in this page element area. Make sure you use the code format above (<p> and </p> around each image) and use eight images. If not, it won’t look right on your blog. Again, the code snipet above is the exact code I’m using for the default images on your blog.
Hopefully this step makes sense and you’re able to add the images you want. If not, just remove the page element and move on.
Step #8 – Configure the Three 125×125 Ad Spots
I don’t know about most of you but I like to try and monetize my blogs. It’s a great passive income stream and fun to see how much you can make. Don’t expect a lot to pour in but at least get some ads on your site to make a few bucks. If you haven’t already read my “How to Make Money From Your Blog – Tip #1” article about setting up Google AdSense on your blog, I’d advice you to read it. You can create 125×125 ads within Google and place them in these spots, for example.
Now let’s go edit the page element. You need to have three 125×125 ads ready to pop into this spot otherwise it’s not going to work. The images also need to be hosted somewhere so make sure you’ve got everything ready before moving forward. Here’s an example of what your code will look like:
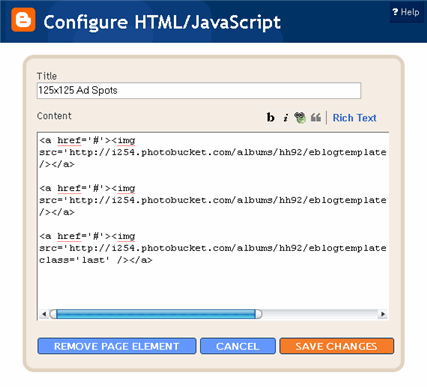
This is the actual code currently being used in your blog template. It’s placeholder code but important to keep so continue reading to understand why.
<a href="https://www.linkworth.com/?a=10230"><img src="https://i254.photobucket.com/albums/hh92/eblogtemplates/adstheme/banner-linkworth2.gif" border="0px" /></a>

<a href="https://www.widgetbucks.com/home.page?referrer=10252004"><img src="https://images.widgetbucks.com/images/referral/125x125_A.gif" border="0px" /></a>

<a href="https://www.text-link-ads.com/?ref=2164"><img src="https://i254.photobucket.com/albums/hh92/eblogtemplates/ads/text_link_ads_F_125x125.gif" border="0px" class='last' /></a>
It’s very important you keep the formatting of this section intact otherwise they won’t appear properly. I’m mainly speaking about the class='last' tag at the end of the third 125×125 ad. If that isn’t included in your code, it will look funny on your site. This is a hard step so hopefully you got this far.
If you don’t have any ads to use yet, feel free to keep the placeholder ads there. I recommend clicking on the three ads and setting up accounts with them so you can make money with your blog. If you don’t want the ads you can just delete this page element from your page layout.
Step #9 – Change the Puppy Header Image
Yes, you’re probably wondering why there’s a picture of a cute puppy on your blog. The good news is I actually put it there as a placeholder so it’s easier for you swap out and add your own image. The bad news is you’ll need to have some photo editing skills in order to get the image setup correctly. So first let me tell you how to change the image and then second, explain how to add your own instead. The puppy image code is in the .css part which looks like this:
/*=== Change this header puppy picture to one of yours ===*/

#polaroids-pic{

background: url(https://i254.photobucket.com/albums/hh92/eblogtemplates/polaroid/puppy.png) no-repeat;
This is where you’ll need to put the link to your new image. If you don’t want an image at all (or at least for the time being) then just delete the url and the default black polaroid picture will appear. The puppy picture is just positioned on top of the default black picture.
So before you can add a new photo, you’ll need to properly size and rotate it. So open your picture in any photo editor like MS Paint, Adobe Photoshop, Paint.net (free download), GIMP (free download), or Picasa. If you don’t have software already installed, you can always use one of the free online photo editing sites instead like Picnik, Phixr, or FotoFlexer. Whichever photo editing software you decide to use, get ready to make the following two changes.
- Resize the photo to 240×240
Rotate the photo 4 degrees counter clockwise
Update (2/1/08)
Due to popular demand, I’ve made the polaroid header image straight so it’s easy to add your personal photo without having to rotate it. It’s included in the latest version so just download and you’ve got it.
This sets up the photo to the right size to fit back on top of the polaroid background. Next, save the image you just modified (You can save the photo in any of the standard image formats like png, gif, jpeg, etc) and upload it to a place online where you can link to it.
There are free image hosting services like Photobucket, Googlepages, or ImageShack just to name a few. I personally use Photobucket but any of those will do. You’ll need to setup a free account and then you can upload your images. After you’ve uploaded your new image, you need to get the url where the image is now located. If you decided to use Photobucket, your new url will look something like this:
https://i254.photobucket.com/albums/hh92/yourname/newfolder/yourpicture.png
Take that url and replace the puppy.png url I showed you above. Save your template and reload your blog. Your new picture should now be on your home page! If not, then double-check and make sure you correctly uploaded the photo and it works. If you see your photo on your home page but it’s just not aligned properly, then you’ll need to go back to your photo editing program and tweak it some more. Another option is to edit the .css file and search for #polaroids-pic { . There you can the position, height, width, etc for fine tuning. You really shouldn’t need to mess with those settings though.
UPDATE: If you also want to remove the “Polaroid of Me” text across the default polaroid picture you can. You’ll need to edit the template code and replace the existing polaroid image on line 219 with this one. Search for “rotator.png” then replace it with “blank-polaroid.png” and you should be good to go. (Thanks to Lindsay in the comments below for the suggestion!). The latest download version now comes without the text on the polaroid picture.
Step #10 – Change the Navigation Header Links
This probably should have been step #1 but I honestly forgot about them until now. These links are hard coded into the template so you need to edit the actual code to make them work. Just edit the code template and search for the following bits of code:
<li><a href='/'>HOME</a></li>

<li><a href='#'>ABOUT ME</a></li>

<li><a href='#'>ANOTHER PAGE</a></li
You should keep the HOME link as is since it just points back to your home page. You’ll also want to change the links on the right side as well:
<li><a href='#'>ADVERTISE</a></li>

<li><a href='#'>CONTACT</a></li>

<li><a href='#'>SITEMAP</a></li>
Now just change the a href=”#” and tab name to something you want for each of the links. Do it for both sides and that’s it. Pretty easy actually. Just make sure to save it and say yes when it asks you to delete several page elements like HTML1, HTML2, etc. I don’t know why it asks you each time when you save your template. I think it’s a Blogger bug actually.
Well folks, after 2 hours of writing this up and 8+ hours of converting this template to Blogger, I’m officially done! I hope you enjoy the template and the instructions on configuring it. If it wasn’t for Adii (the original designer), this template never would have been available to convert into a Blogger template!
If you have any questions please post below using the comments box. Please be aware I am not a photo editing expert and questions should only relate to configuring this template. Blogger in general, has lots of bugs so any “bx-” type error messages you may get I won’t be able to help you. Sorry but it’s Blogger’s fault not mine or yours.
Revision History
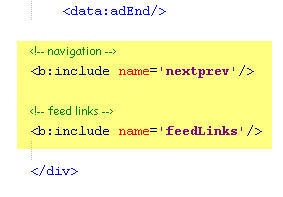
Update (2/25/08) – A bug has been found and fixed as of today. It’s a small one but it was brought to my attention by Tessa and Rey. The “Next” and “Previous” posts links were missing from the bottom of the template. If you downloaded this template prior to today, you’ll either have to download it again or fix your existing template. The fix is pretty easy and as follows:
Search your template code for the tag <data:adEnd/>. There should actually be two of them. You want the second one. Below that code you want to paste:
<!-- navigation -->

<b:include name='nextprev'/>
<!-- feed links -->

<b:include name='feedLinks'/>
The final block of code should look like this:
You’ll then want to style this new set of links which is also easy to do. Scroll back up to the top of your code and in the .css section you’ll want to add the following code:
#blog-pager-newer-link {float: left;}

#blog-pager-older-link {float: right;}

#blog-pager {padding:50px 15px 0px; text-align: center; }
This will make your new links aligned neatly instead of being squished to the left. You can style them even further (color, size, etc) but you’ll have to do that on your own.
Update 4/22/08 – Several people requested to have real 125 x 125 ads instead of the blank placeholder ones so this has been done. A new screen shot shows how this looks as well as the live demo. You can swap out the ads or keep them there indefinitely if you don’t have any ads to use.
Update 5/17/08 – Fixed the individual post image right align issue. You can easily fix this yourself if you’re using this template prior to 5/17. Search your template code for “.postmetadata” and then change the padding element of “15px” to “20px”. That will push everything down and align the images correctly. Thanks to Ricardo for his help on this.
Ready to super charge your blog? Check out our professional premium blogger templates or make money by joining our blog affiliate program!
Want to make your blog stand out from the crowd? I recommend giving your newly downloaded Blogger template a unique and personalized look. Read our Free Blogger Header Images article and find yourself a great custom header image!
If you like this post then please consider subscribing to our eBlog Templates RSS feed. You can also subscribe by email and have new templates and articles sent directly to your inbox.
Trackbacks
- Top 20 Free Blogger Templates | Geeks Desk on March 18, 2012
- 100+ Excellent Blogger Templates on August 12, 2012
- 120 Best Free Blogger Templates Around part I | Template joomla, wordpress premium free , ebook on October 11, 2012
- 120 Best Free Blogger Templates Around | DenzoMag on December 23, 2012
- “WP-Polaroid” Blogger Template - BlogPublish on January 22, 2013
- Magazine Blogger Templates - Blogger Seed on August 10, 2013
- En Çok Beğenilen Wordpress Temaları | hakan dündar on October 22, 2015
774 Responses to “WP-Polaroid Blogger”
Blogger Sponsors
- Get Paid to Write Reviews on Your Blog
- Yaro Starak's 10 Great Blog Traffic Tips
- Create Cool Images With a Wet Floor Effect Maker
- Why Most Bloggers Are Stuck - Reporters vs Experts
- Google Friend Connect - New Social Network
- Mashable's "70 Fresh & Modern Blogger Templates" List
- Free Blogger Training Videos
- Improve Your Google Rankings in One Easy Step
- "What Blog Template Should I Make Next?" Contest Results
- Top 5 Free Blog Header Image Websites
- Improve Your Blog in 31 Days – Guaranteed
- Build a Better Online Business with WordPress
- Become a Blogger Just Reopened – 5 Days Only!
- Roadmap to Become a Better Blogger
- Free Image Hosting – Photobucket
- How to Install Google Analytics on Blogger
- Improve Your Google Rankings in One Easy Step
- 50 Excellent Blog Footers
- Free Instant Blog Logos
- Create Cool Images With a Wet Floor Effect Maker
- Lyrics: "It was a useful document. Thank you." Blog Videos (66 comments)
- Birthday: "Hello. It worked great for me, thank you." Blogger Ad Code Converter (846 comments)
- paus88: "situs slot yang sangat gacor yang pernah ada di Asia..." Blogger Ad Code Converter (846 comments)
- paus88: "paus88 is the most exciting slot site that has ever..." Blogger Ad Code Converter (846 comments)
- tokovvip: "situs togel hongkong tokovvip yang terpercaya ini..." Blogger Ad Code Converter (846 comments)
- tokovvip: "situs togel hongkong terpercaya hanya ada di tokovvip..." Blogger Ad Code Converter (846 comments)
- Wadud: "Very very helpful. Thank you." Blogger Ad Code Converter (846 comments)
- Maria: "Very effective it is and It helps a lot for me. Thank you..." Blogger Ad Code Converter (846 comments)
- noob: "We carefully select honey to reach you with the highest..." Blogger Ad Code Converter (846 comments)
- Textile Mentor: "This post is very creative I liked it. keep..." Blogger Ad Code Converter (846 comments)
thnxx 4 sharing really nice …
thanks very nice job. But i think there is a probLem aLittle
When i go do modify the navigation in the HTML CODE i cant find the lines HOME
ABOUT ME
ANOTHER PAGE</li
I have modify a lot of things on a lot of templates but I cant find how to modify this can some body help me out ?
http://www.quebeccouponsrabais.com
very nice template, would like to use it on one of my blogs
Thanks for the information you shared that’s so useful and quite informative
Your site very nice, thank you admin
Great template. Easy to follow the instructions provided
Good template.
My blog http://www.modemquang.com
nice templates. thanks for share
I love this template. I recommend it to everyone…
very nice. thank alot
my site: http://tourthailan.com
Template Bogspot Keren dan Elegant
I am trying to find this image listed in the xml code
ico-hdr1.gif
I think it is somewhere here:
.postimg img.fl{
margin: -10px 15px 0 0;
padding-bottom:15px;
I am not seeing this image in the xml file. Does anyone know what are where this image might be so I can edit it?
Hi there…! I’ve modified this polaroid blogger theme to NEW one! Have a look and it’s free… http://newpolaroid.blogspot.com/
So here’s a really great themes ! thanks for share.
Сейчас попробую установить на свой блог http://www.vlastel.in.ua – посмотрим что получится. Спасибо
70-410
70-488
70-461
MB5-705
200-120
70-486
70-411
000-416
70-573-VB
650-261
250-352
000-N55
COG-200
1Z0-535
1Z1-805
FM0-305
70-529-VB
MD0-251
000-514
3302
650-312
1Z1-048
1z0-526
98-365
HP5-B04D
PMP
642-874
70-332
PRINCE2
1Z0-051
70-463
EX200
C4040-250
300-115
640-554
70-533
70-532
70-243
E10-001
VCP-550
1Z0-062
70-466
200-101
70-489
70-412
070-410
300-101
9L0-422
1Z0-060
70-411
CISSP
300-115
70-347
070-486
70-462
CCD-410
70-532
400-101
EX200
HP2-B115
70-467
70-534
070-461
220-802
SY0-401
220-801
MB2-708
070-488
C4040-252
70-410
200-120
C4040-250
70-486
70-461
MB5-705
70-488
AWS-SysOps
70-410
70-488
70-461
MB5-705
200-120
70-486
70-411
70-480
70-346
70-462
70-347
70-412
70-483
70-417
MB2-703
70-331
220-802
C4040-252
C_TADM51_731
1Z0-061
70-487
400-101
CCD-410
100-101
MB2-700
1Z0-060
70-463
EX200
C4040-250
300-115
C_TADM51_731
300-101
70-417
CCD-410
C4040-251
1Z0-060
070-410
70-347
300-115
HP2-B115
70-411
070-486
70-410
200-120
70-486
70-461
70-480
70-417
C4040-252
C4040-252
9L0-422
CCD-410
70-532
400-101
EX200
HP2-B115
70-467
70-534
640-554
810-401
70-346
HP0-S41
70-412
MB2-704
70-483
70-480
300-101
70-417
CCD-410
070-486
70-410
200-120
C4040-252
MB5-705
70-410
C4040-250
70-461
200-120
70-486
810-401
70-483
70-417
640-554
70-488
CCA-500
N10-005
C4040-252
MB5-705
70-410
C4040-250
70-461